How to Take Photos for eBay That Sell
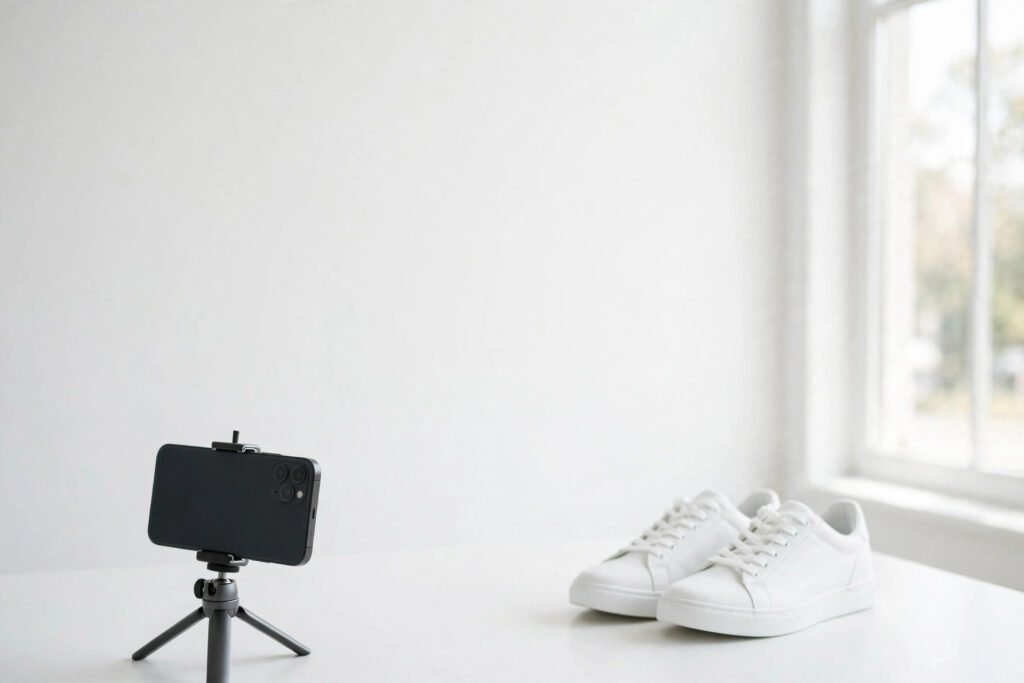
To take photos for eBay, shoot in window light against a white background, steady your phone on a tripod, fill the frame, and take 8 photos: front, back, sides, top, a close-up of any flaw, a scale shot, what is included, and packaging. eBay requires one photo of 500 by 500 pixels and allows up to 24 photos per listing.
On eBay, the buyer cannot pick your item up, turn it over, or check it for damage. Your photos are the inspection. A listing with one dark, tilted photo asks the buyer to take your word for everything; a listing with eight clear photos answers every question before it is asked. That is why photos are not decoration — they are the part of the listing that does the selling. At Zyrro, we read eBay’s own photo rules and built this guide around them, so every number below comes from eBay’s help pages, not from guesswork.
Why do eBay photos matter so much?
Three facts from eBay’s own help pages explain it. First, your main photo — the first picture you add — appears next to your item’s title in search results. Before a buyer reads a single word of your title, they have already judged your photo. Second, eBay lets buyers zoom into photos, so a sharp, well-lit image lets them inspect stitching, labels, and wear marks the way they would in a shop. Third, eBay stores copies of your photos in completed listings for up to 90 days, so your photos keep working for you as comparable sales long after the listing ends.
Photos also protect you after the sale. Most “not as described” returns start with a photo that hid something: a scratch the buyer only found on arrival, a missing accessory that was never shown, a size that looked different in the picture. A clear flaw photo and a scale shot, taken before you list, are your evidence that the buyer saw exactly what they were getting. Our guide to offering free returns on eBay shows what a return costs you; good photos are the cheapest way to prevent the avoidable ones.
How do I take a good picture of my product?
A good eBay photo is built from five parts, and none of them costs money. Get all five right and a phone photo looks professional; miss two and even an expensive camera will not save the shot.
1. Light first. Put your item near a large window in soft daylight. The window is your studio light, and it is free. Never shoot with the room lights as your only light — they mix yellow and white light and make colours look wrong.
2. A plain background. A white poster board, a white bed sheet, or a plain wall. eBay’s own advice is to display items in an uncluttered space against a neutral backdrop, and that white backgrounds are generally best. The background should disappear so the item is the only thing the eye sees.
3. A steady phone. A small tripod, a stack of books, or a mug with the phone leaning on it. A steady phone means a sharp photo, and sharp photos are what let buyers zoom in with confidence. eBay’s Seller Center guidance suggests a camera of 12 megapixels or more — every modern phone clears that easily, so the phone is not the limiting factor. Steadiness is.
4. Fill the frame. Move the phone closer instead of zooming. The item should take up most of the frame with a small margin around it. A tiny item floating in a big empty frame tells the buyer nothing; a filled frame shows texture, condition, and detail.
5. A clean item. Wipe it down before you shoot. Dust, fingerprints, and smudges that you can barely see in person become obvious in a close-up. For used items this step matters twice as much, because a wipe with a cloth is the difference between “gently used” and “looks neglected” in the photo.
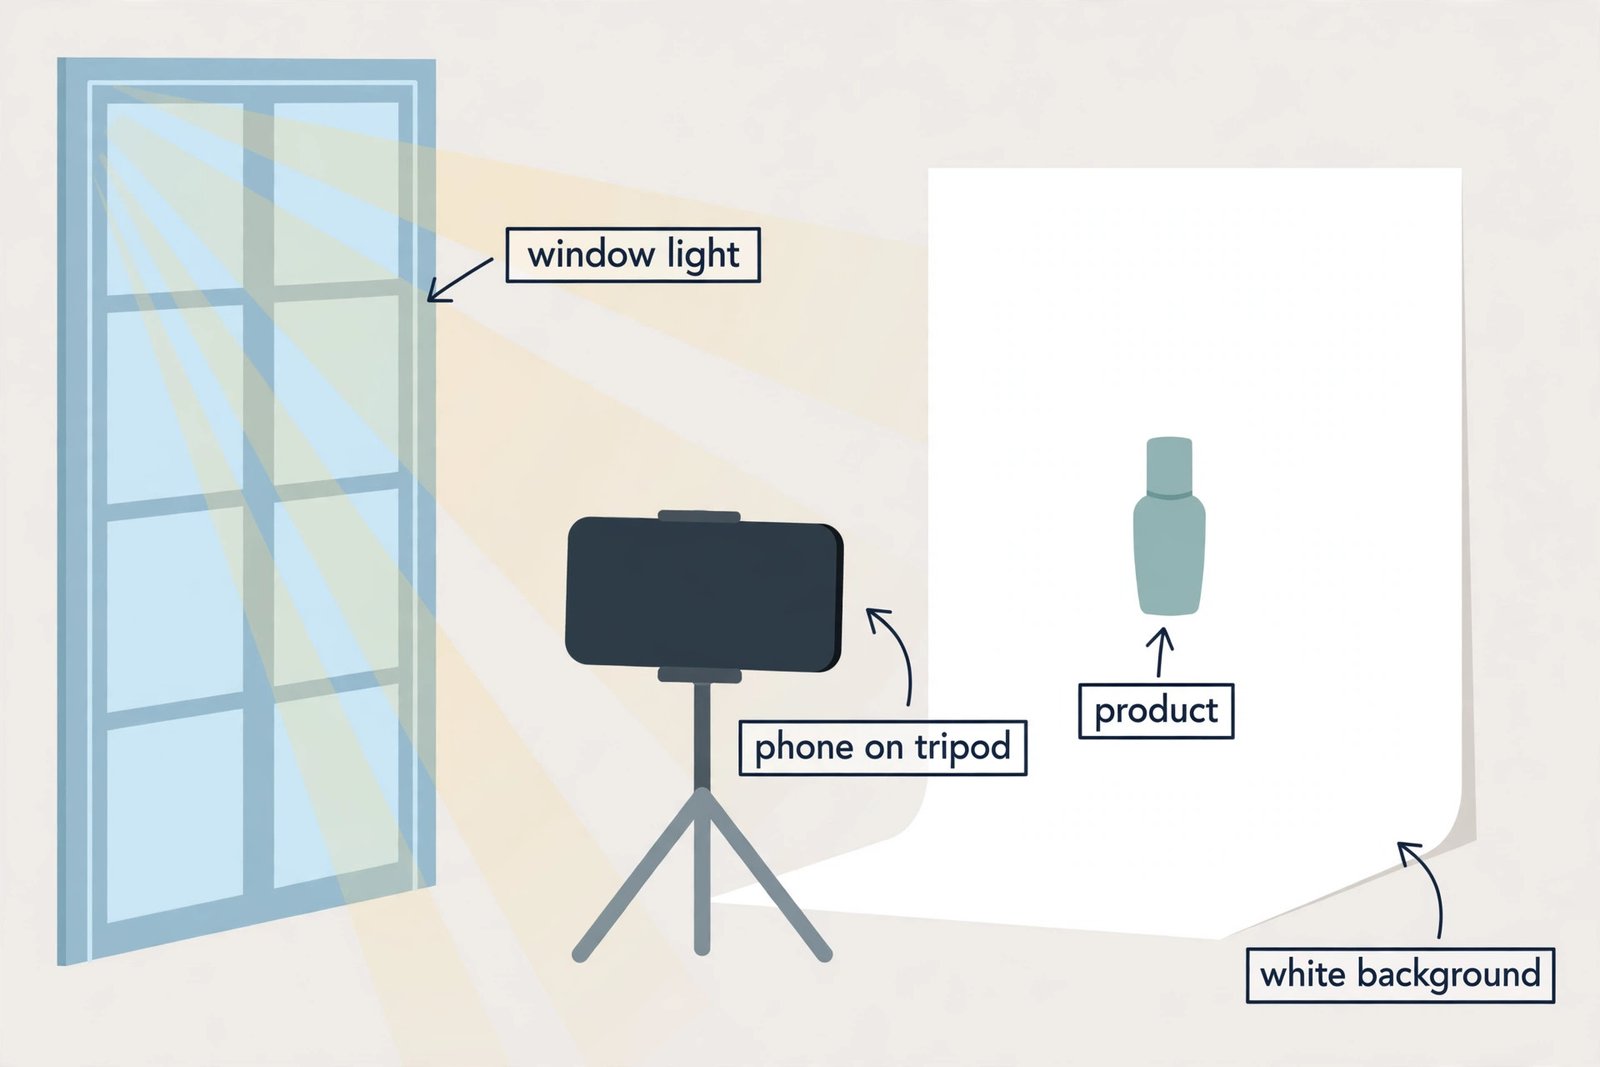
The whole setup: window light on the left, phone on a tripod in the middle, product on a white background. Nothing here costs more than a poster board and a phone you already own.
What is the best lighting for taking photos?
Soft, bright, even light — and the cheapest source of it is a window on a cloudy day or a window with indirect sun. Direct sunlight is the most common lighting mistake: it throws hard shadows across the item and blows out bright areas so detail disappears. If the only light you have is direct sun, hang a white sheet or a piece of baking paper over the window to soften it, or move the item a metre back from the window.
| Light source | Result | When to use it |
|---|---|---|
| Window, cloudy day or indirect sun | Soft, even, true colours | Default choice — best for almost everything |
| Window, direct sun | Hard shadows, blown-out highlights | Avoid, or soften with a white sheet over the window |
| Two LED lamps at 45 degrees | Even light, no shadows | Evenings, windowless rooms, or very shiny items |
| Room ceiling light only | Yellow cast, top-down shadows | Avoid as your only light |
| Phone flash | Harsh glare, flat colours, reflections | Never — turn it off |
Two practical rules cover most situations. First, keep the light coming from the side or from behind the camera, never from behind the item — backlight turns your product into a silhouette. Second, use one kind of light at a time. Window light plus a yellow room lamp gives the photo two different colour casts at once, and no edit fully fixes that. If you are shooting at night, turn the room lights off and use two matching LED lamps, one on each side of the item, angled at about 45 degrees.
For shiny or reflective items — jewelry, watches, electronics with glass screens — light behaves differently, and eBay says so directly: a dark background may work better than white for these, because a white background bounces light back into the lens and washes the item out. Angle your lamps so they light the item without reflecting straight into the camera, and shoot from a slight angle instead of dead-on. A piece of black card behind a silver necklace will show it far better than a white sheet will.
How do I take product photos with my phone?
You do not need a camera. A modern phone, set up right, produces photos well above eBay’s requirements — eBay asks for a minimum of 500 by 500 pixels and recommends about 1600 pixels on the longest side, and any phone from the last several years shoots far larger than that. The settings below take two minutes and you only set them once.
On iPhone: open Settings, then Camera, and switch on Grid so you get the rule-of-thirds lines on screen. Open the Camera app, tap the item on screen to focus on it, and slide your finger up or down to adjust brightness until the item looks true to life. Shoot with the 1x lens and move your feet closer instead of pinching to zoom — digital zoom just crops the photo and softens it. Hold the phone level: line the item up with the grid lines so vertical edges stay vertical. Use the volume button or a timer (3 seconds) as the shutter so tapping the screen does not shake the phone.
On Android: open the Camera app, go to Settings, and switch on Grid lines. Tap the item to focus, then drag the brightness slider until the exposure looks right. Use Photo mode and the 1x lens, and step closer instead of zooming. Most Android camera apps let you set the picture size — pick the highest resolution available so eBay’s zoom stays sharp. As on iPhone, a 3-second timer or a volume-button shutter avoids shake.
Two settings matter on both phones. First, shoot in the 4:3 or square ratio your phone offers rather than a wide panoramic ratio — eBay says photos in a 1:1 or 16:9 ratio look best, and your photo is cropped to fit one of those, so a very wide shot loses the top and bottom of your item. Second, check the photo after each shot. Zoom into it on the phone screen: if the label text is readable and the edges are sharp, move on; if it is soft or the colours look wrong, re-shoot now, while the setup is still in place. Re-shooting later means rebuilding the whole setup.
How many photos should I post on eBay?
eBay allows up to 24 photos per listing, and you should use as many as the item needs — photos cost you nothing to add, and every unanswered question in a buyer’s head is a reason not to buy. Our recommended shot list for a typical used item is eight photos. It covers the four things buyers check: the item, the condition, what is included, and how big it is.
| Shot | What it shows | Why it matters |
|---|---|---|
| 1. Front, face-on | The whole item, straight on, centred | This is your main photo — the one in search results |
| 2. Back | The reverse side, labels and markings | Buyers check the back for wear and model details |
| 3. Side | Profile view, depth and shape | Shows thickness, profile, and anything the front hides |
| 4. Top | Top-down view | Shows the top surface and overall condition |
| 5. Flaw close-up | Every scratch, dent, stain, or missing part, up close | Prevents “not as described” returns — see below |
| 6. Scale | Item next to a ruler, coin, or your hand | Stops size surprises — the top cause of disappointed buyers |
| 7. Included | Box, cables, accessories, manuals laid out | Proves what comes with the item |
| 8. Packaging | The item packed or in its original box | Shows care, and helps if the buyer claims damage in transit |
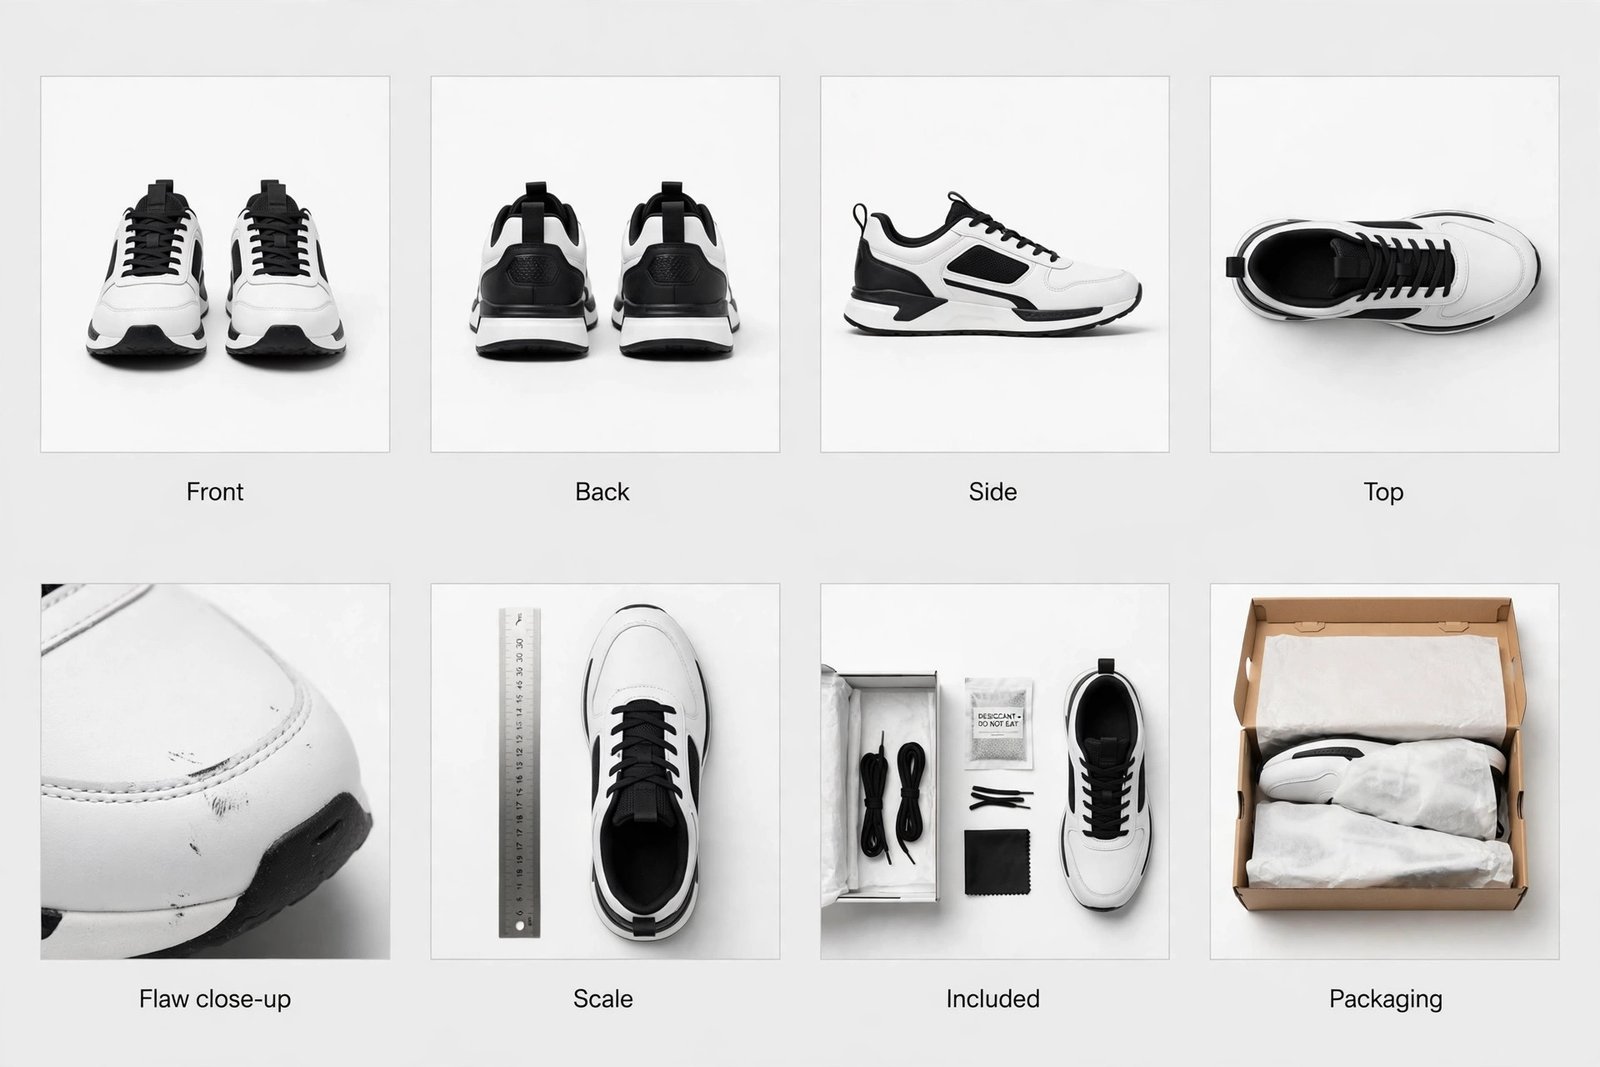
The 8-photo shot list on one pair of sneakers: front, back, side, top, a scuff close-up, a ruler for scale, the included accessories, and the packaging.
How many photos you need depends on the item. Use the table below as a starting point, and add a photo for every flaw, every angle a buyer could reasonably ask about, and every included extra.
| Item type | Photos to aim for | Extra shots worth adding |
|---|---|---|
| Simple, new, one-piece item | 4 to 6 | Label close-up, scale shot |
| Clothing and shoes | 8 to 10 | Size label, fabric close-up, sole, inside |
| Electronics | 10 to 12 | Screen on and off, ports, serial label, accessories |
| Collectibles and antiques | 12 or more | Maker marks, signatures, damage from every angle |
| Multi-part sets and bundles | 10 to 12 | Each part separately, everything laid out together |
One warning: more photos only help if they are all good. Twelve sharp photos beat twenty-four blurry ones, and a listing with eight clear photos will outsell a listing with one. If you are short on time, take the front, back, flaw close-up, and scale shot first — those four answer the questions buyers ask most.
What are eBay’s photo rules?
Every rule in this table comes from eBay’s own help article “Adding pictures to your listings”, read on 9 November 2026. These are the rules your listing is judged against — follow them and your photos will not be the reason a listing underperforms or gets flagged.
| Rule | What eBay says |
|---|---|
| Minimum photos | At least one picture is required for every listing |
| Maximum photos | Up to 24 pictures and one video per listing |
| Minimum size | 500 by 500 pixels |
| Recommended size | About 1600 pixels on the longest side; “for best results, use photos that are at least 1600 pixels on the longest side” |
| Maximum file size | 12MB per photo |
| Aspect ratio | 1:1 (square) or 16:9 (landscape) look best; your photo is cropped to fit |
| Accepted formats | JPEG, PNG, GIF, TIFF, BMP, WEBP, HEIC, AVIF |
| Graphics ban | Do not add badges, logos, copyright notices, or watermarks — they can affect your listing’s placement in search |
| Used items | You cannot use a catalog or stock photo — photograph the actual item you are selling |
| Main photo | The first picture you add is the main photo and appears next to your title in search results |
Two of these rules catch sellers out most often. The first is the graphics ban: a watermark with your shop name, a “free shipping” badge, or a logo in the corner can push your listing down in search, so keep your photos clean and put that information in the title or description instead. The second is the used-item rule: for a used item, the photo must show the actual item in your hands, not the manufacturer’s product shot. eBay is explicit about this, and a listing that breaks it can be removed. For new items in sealed packaging, a stock photo is acceptable — but your own photo of the sealed box still builds more trust.
A note on conflicting advice you may see elsewhere: some older guides say eBay photos are limited to 7MB each. That figure is out of date. eBay’s current help article says 12MB per photo, and that is the number this guide uses. If a photo will not upload, check the format first — HEIC photos from iPhones are accepted, but if you run into trouble, export as JPEG and try again.
What is the best background for eBay photos?
White is the default answer, and eBay says so directly: white backgrounds are generally best. A plain white background does three things at once — it makes the item stand out, it makes the listing look consistent in search results, and it tells the buyer nothing is being hidden. A white poster board, a white sheet, or a white wall all work. Curve the board up behind the item so there is no visible line where the surface meets the wall, and the background looks seamless.
| Background | Best for | Watch out for |
|---|---|---|
| Plain white | Almost everything — the default | White or very light items can blend in; add a slight shadow or use a light grey instead |
| Light grey | White items, silver, chrome | Keep it even — a stained or creased sheet looks worse than white |
| Dark or black | Jewelry, shiny and reflective items | Dust shows up clearly on black; wipe the surface before every shot |
| AI-generated scene | Showing an item in use, e.g. a lamp on a desk | Use for a few photos only — eBay’s Seller Center warns the background must not distract from the item |
| Patterned, busy, or cluttered | Nothing — avoid | Patterns fight the item for attention and make the listing look unprofessional |
Consistency matters as much as the colour. If every listing in your shop uses the same white background, the same framing, and the same lighting, buyers start to recognise your listings in search — and they trust a shop that looks like a shop more than one that looks like a random pile of photos. Pick one background and one setup, and use it for every item. That is also faster: once the setup is fixed, each new item takes minutes to photograph instead of half an hour.
How do I photograph flaws without losing the sale?
Photographing a flaw feels like admitting a problem, but it does the opposite: it proves you are honest, and honest sellers get fewer returns. A buyer who sees a scuff in the photo and buys anyway cannot open a “not as described” case over that scuff. A buyer who discovers it on arrival can — and the return will cost you the postage both ways plus the time. eBay’s own guidance is to show flaws with close-up images, and to say what the flaw is in the description and price accordingly.
The technique is simple. First, use raking light: put a lamp or a window at a low angle to the surface so the light skims across it. Scratches, dents, and wear that disappear under straight-on light become clearly visible under raking light. Second, take the close-up at an angle that shows the flaw in context — a scratch on a shoe means more when the buyer can see it is on the toe, not floating in a cropped square. Third, put the flaw photo near the end of your photo set, after the good photos, and name it in the description: “Small scuff on the left toe, shown in photo 5.” That one sentence removes the buyer’s fear that you are hiding something, and it is also the sentence that protects you if the buyer later claims they did not see it.
Price the flaw, too. A used item with a visible scuff should not be priced like a mint one — buyers compare against other listings, and a fair price for the condition shown is what turns the flaw photo from a warning into a bargain. Our guide to pricing items on eBay shows how to check sold prices for the same item in the same condition, so you can price the flaw honestly instead of guessing.
How do I remove the background from eBay photos?
If your background is a cluttered room or a coloured sheet you cannot replace, eBay has a built-in tool for it. The official name in eBay’s help article is the background enhancement tool — it does the job of the background-removal feature sellers talk about, and it works on the eBay website and in the eBay app.
On the eBay website: when you are creating or editing a listing, select the Background icon on the photo. It automatically replaces the background with a solid white colour. That is the whole process — one click, white background.
In the eBay app: tap the Background icon on the photo, then choose White to change the background to a solid white colour. Or choose one of the AI-generated backgrounds — Studio, Surface, or Outside — to place the item in a generated scene. Within the AI options you can also select Edit scene to see more options, or Generate more for different versions. Select Apply, then Done.
Use the white option for your main photo and for any photo where the item itself is the point. Use an AI-generated scene sparingly — one or two photos at most, and only where the scene genuinely helps the buyer picture the item in use. eBay’s Seller Center gives the same warning: an AI background should never distract from the item. And check the result closely after the tool runs: background removal can eat thin edges — watch straps, laces, cables, and glass edges are the usual victims. If the edge looks chewed up, re-shoot against a real white board instead.
How do I upload photos to eBay from my phone?
Uploading from your phone is the fastest path, because the photos are already on the device. In the eBay app, start a listing from the Selling tab, and when you reach the photos section, tap Add photos and pick from your gallery or take a new photo on the spot. You can reorder photos by dragging them — remember that the first photo is the main photo in search results, so put your best face-on shot first. On the eBay website from a mobile browser, the same listing form lets you tap to upload from your gallery.
Before you upload, do a thirty-second check on each photo. Is it the right way up? Is the item in focus when you zoom in? Is the file under 12MB? Phone photos at full resolution can pass 12MB, especially on newer phones — if eBay refuses one, export it as a JPEG at slightly lower quality or take the shot again at a lower resolution setting. Finally, after the listing is live, open it yourself from search and look at the photos as a buyer sees them. That check takes ten seconds and catches the rotated photo, the wrong main photo, and the upload that silently failed — all of which are cheaper to fix before the first buyer sees them.
How much does a good eBay photo setup cost?
Nothing, if you use what you already have — and very little if you buy the two items that actually make a difference. The table below shows the real options, with typical prices so you can see how little stands between a bad photo and a good one.
| Item | Free option | Budget buy (typical price) | Worth it? |
|---|---|---|---|
| Light | A window on a cloudy day | Two LED desk lamps, about $15 to $25 | Yes, if you shoot at night |
| Background | White poster board or a white sheet | A folding light tent, about $20 to $30 | Yes for small items; a poster board does the same job for free |
| Steady phone | A stack of books or a mug | A mini tripod, about $10 to $15 | Yes — the single best cheap upgrade |
| Editing | Your phone’s built-in editor, or eBay’s background tool | Free apps like Snapseed or Lightroom Mobile | Free is enough — crop, straighten, and adjust brightness only |
| Camera | The phone you already own | Not needed for eBay | No — spend the money on a tripod instead |
Keep editing light. Crop to remove empty space, straighten a tilted horizon, and adjust brightness and contrast so the item looks the way it looks in person. Do not add filters, do not oversaturate the colours, and never edit out a flaw — a photo that misrepresents the item is the fastest route to a return. The goal of editing is accuracy, not beauty.
What mistakes ruin eBay photos?
| Mistake | What the buyer sees | Fix |
|---|---|---|
| One dark photo, taken at night | An item they cannot inspect | Shoot by a window in daylight; retake, do not brighten a bad photo |
| Cluttered background | An item that looks uncared for | White poster board behind and under the item |
| Blurry or shaky shot | A seller who did not try | Tripod or books, 3-second timer, tap to focus |
| Item tiny in the frame | Nothing — the detail is invisible | Move closer; fill the frame |
| Watermark or logo on the photo | A listing eBay may rank lower | Remove it — eBay says graphics can affect search placement |
| Stock photo for a used item | An item that may not be the one for sale | Photograph the actual item — eBay requires it for used listings |
| Flaw hidden or not photographed | A surprise on arrival, then a return | Close-up of every flaw, named in the description |
| No scale or size reference | An item that arrives the wrong size | Ruler, coin, or hand in one photo; measurements in the description |
| Heavy filter or oversaturated colours | An item that looks different in person | Edit for accuracy only — no filters |
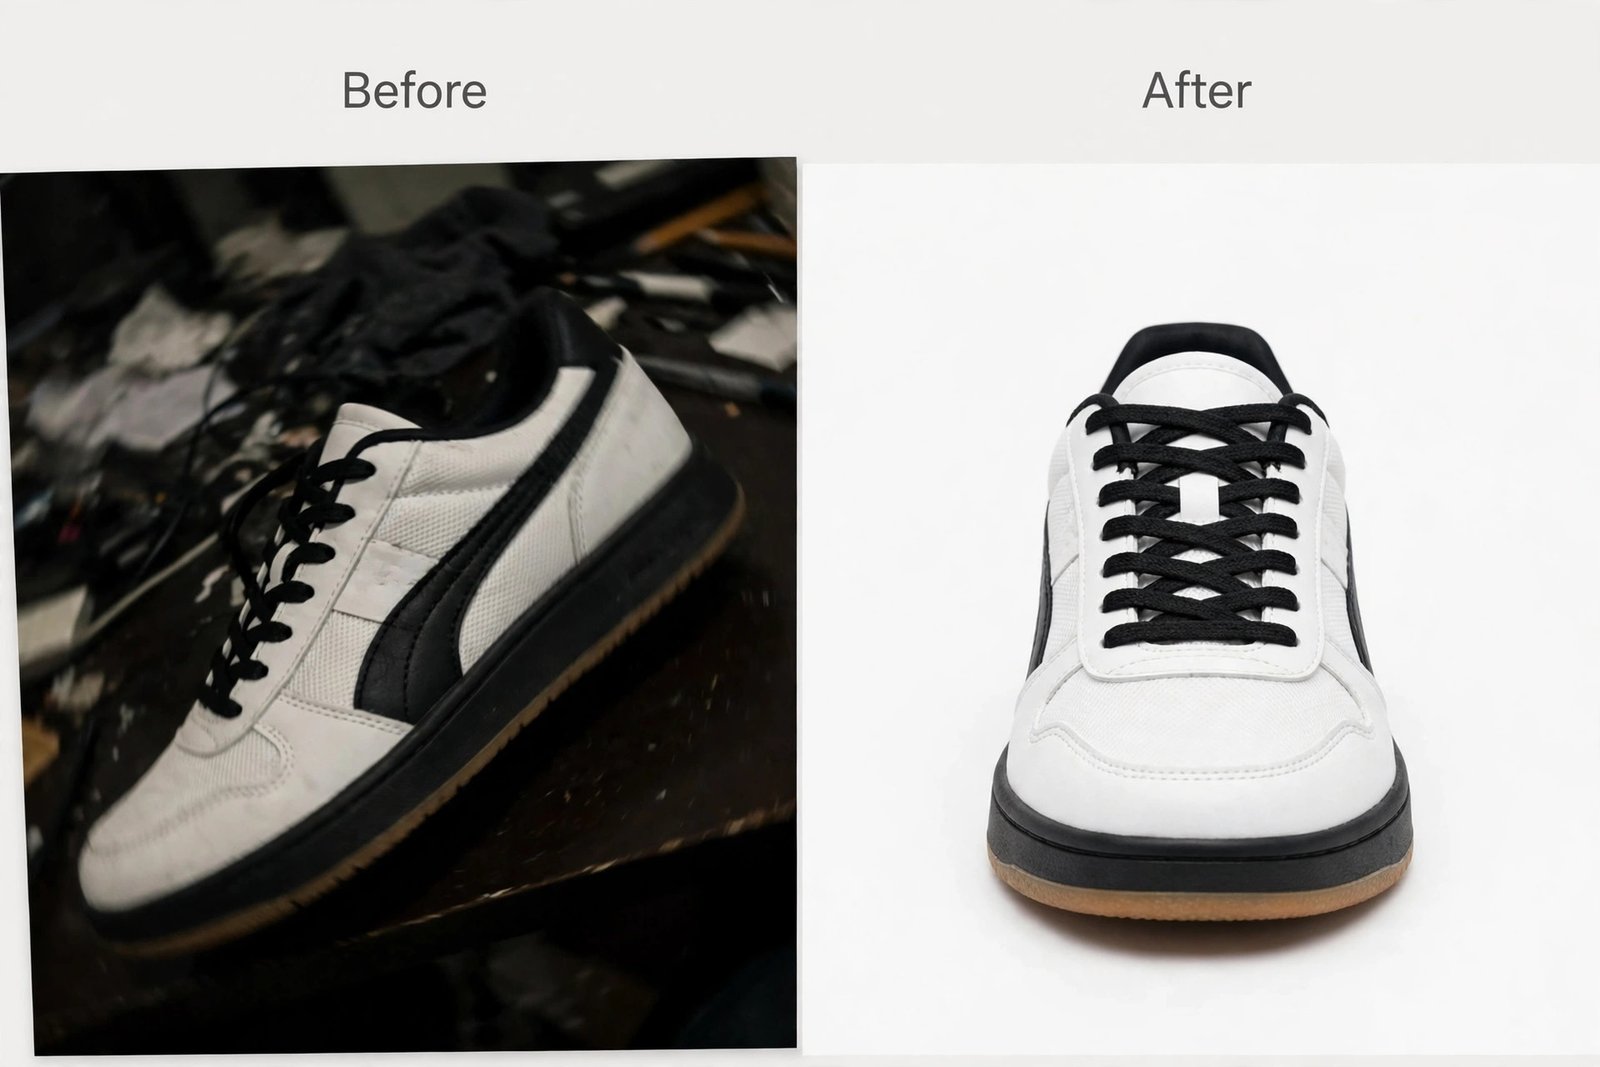
The same kind of item, two different listings. Left: dark, cluttered, tilted. Right: bright, clean white background, straight on. No new camera was used — only light, background, and steadiness.
Two listings, one item: what the buyer actually sees
To see why all of this matters, imagine the same pair of used sneakers listed twice. Listing A has one photo: taken at night under a ceiling light, on a cluttered desk, tilted, with the laces undone and a shadow across the toe. Listing B has eight photos from the shot list in this guide: a bright face-on main photo, the back, the side, the top, a close-up of a small scuff, a ruler for scale, the spare laces and box, and the shoes packed. Both listings have the same title, the same price, and the same description.
A buyer comparing the two is not making a judgement about photography. They are making a judgement about risk. Listing A leaves every question open: what condition is it really in, how big is it, what is included, and will it arrive as shown? Listing B answers all of them before the buyer has to ask. That is the whole advantage of good photos — not that they look pretty, but that they remove the buyer’s reasons to hesitate. This is an illustration of what a buyer sees, not a measured sales test: eBay does not publish how much faster well-photographed listings sell, and this guide does not invent a number for it. What is certain is that a buyer cannot buy what they cannot see clearly.
Frequently asked questions about taking photos for eBay
How do I take a good picture of my product?
Shoot in soft window light against a plain white background, phone on a small tripod or a stack of books. Fill the frame, tap to focus, and wipe the item clean first. Check it by zooming in, and re-shoot while the setup is in place if it is soft or the colours look wrong.
How do I take product photos with my phone?
Switch on grid lines in camera settings, tap the item to focus, and adjust brightness with the slider. Use the 1x lens and step closer instead of zooming. Shoot at full resolution, use a 3-second timer or the volume button as the shutter, and take the photo in 4:3 or square ratio so eBay’s crop does not cut it off.
What is the best lighting for taking photos?
Soft, bright, even light — a window on a cloudy day or in indirect sun is the best free option. Avoid direct sunlight, which throws hard shadows, and never use your phone flash, which creates glare and flat colours. At night, use two LED lamps at 45 degrees on each side, and turn off room lights so colours stay true.
How many photos should I post on eBay?
Use as many as the item needs, up to eBay’s limit of 24 photos. Our recommended minimum is eight: front, back, side, top, a close-up of any flaw, a scale shot, what is included, and the packaging. Simple new items can work with four to six photos, while electronics and collectibles often need ten to twelve.
How do I take photos for eBay on iPhone?
Open Settings, then Camera, and switch on Grid. In the Camera app, tap the item to focus and slide to set brightness. Shoot with the 1x lens, move closer instead of zooming, and use the volume button or a 3-second timer as the shutter. Photos are accepted in HEIC format, but export as JPEG if an upload fails.
How can I take photos for eBay for free?
Use a window for light, a white poster board or sheet for the background, and a stack of books to steady your phone. Your phone’s built-in editor handles cropping and brightness, and eBay’s background enhancement tool turns a messy background white for free. Later, buy a mini tripod for about $10 to $15 and two LED lamps for night shooting.
The short version: taking photos for eBay
Good eBay photos are a habit, not a purchase. Window light, a white background, a steady phone, and eight photos that answer the buyer’s questions before they ask them. Set the routine up once — the same spot, the same background, the same shot list — and every listing after the first takes minutes. At Zyrro, our rule is simple: if a buyer cannot see it clearly in the photo, it does not go in the listing until they can. Start with your next item, and check the listing yourself from search when it is live — what you see there is exactly what your buyers see.
Photos done? The next steps are pricing the item right and shipping it without losing money: our guide to pricing items on eBay shows how to check sold prices, our free-shipping guide runs the fee maths on who pays for postage, and our free eBay fee and profit calculator works out your exact fees and profit before you list. If a listing still is not selling after the photos are fixed, our relist guide explains when to relist and when to sell similar instead.